GeMarkt Blog · Practical guide
Staircase Wall Art: Hanging a Rising Gallery
Plan a staircase gallery with upright frames, a rising centre line and a clear landing, while separating the layout from safe access and installation.

A staircase gallery works when the pictures make sense from the bottom, along the climb and at the landing. Start with a small group of upright frames whose centres rise together, then decide where that group should stop. The frames do not need to tilt with the stairs, and the wall does not need to be covered from floor to ceiling.
Plan the composition separately from installing it. A position that looks easy to reach in a drawing may require specialist access equipment in a stairwell. If the installation cannot be done safely, change the layout or use a qualified installer rather than improvising a platform.
Start with the route and the viewpoints
Walk the stairs normally before choosing pictures. Notice where you can stop comfortably, what you see through the balustrade and which wall is visible from the hallway. A picture near the bottom may be seen mostly from an angle; a landing wall may offer the only direct view. Give the most detailed image the place where you can actually look at it.
Sketch the handrail, doors, switches, windows and changes of wall direction. Include frame depth, not just width and height. A chunky moulding or projecting shelf may intrude into a narrow passage even when its outline fits the wall. Keep the handrail usable and do not reduce required passage or escape clearances; an installer should check applicable requirements if the arrangement is close to those limits.
There is no single meaningful eye-level measurement for a whole flight. Someone’s standing level changes as they climb. Use the view from several normal positions to judge the composition, without stopping people in an awkward place or asking them to lean over the stair opening to inspect it.
Draw a rising line but keep frames upright
A useful starting arrangement is a line through the picture centres that broadly follows the flight’s rise. Keep the top and bottom edges of each frame horizontal. This produces a stepped sequence rather than a set of tilted pictures. The line is an organising device in your drawing, not something you must mark across the wall.
For a worked example, take three outside frames measuring 40 cm wide by 50 cm high. Put their centres 60 cm apart horizontally and raise each successive centre by 30 cm. Adjacent horizontal edges are then 20 cm apart: 60 − 40. The complete group is 160 cm wide, from the first left edge to the last right edge, and 110 cm high, from the first bottom to the last top.
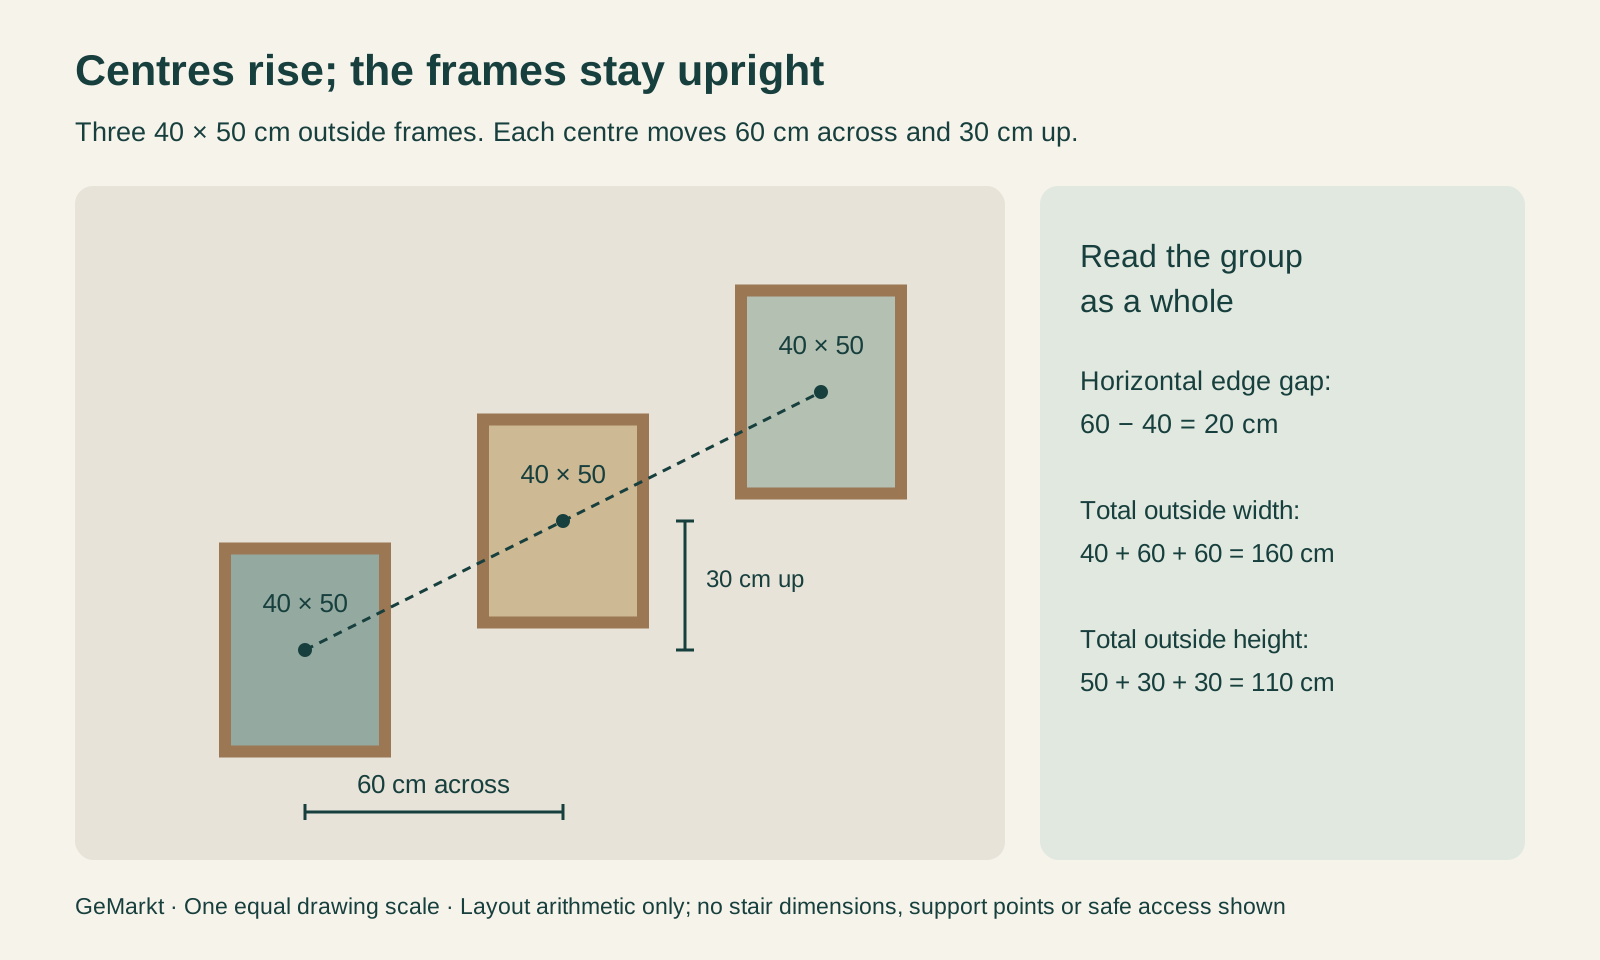
That example rises one unit for every two units of horizontal travel. Your staircase may be steeper, shallower or curved, so use its actual appearance rather than copying the numbers. Also distinguish a horizontal gap from a measurement taken diagonally between corners. Writing down which measurement you mean prevents surprisingly uneven results.
Choose the pictures before filling the wall
A group of three related works is enough to establish the idea. You might connect them through a subject, a shared print technique or a colour that appears in each. Their relationship should remain visible as you move past, rather than depend on reading a long explanation from the steps.
Equal outside frames make the spacing easier to judge, even if different mount openings accommodate different image proportions. They are not compulsory. For a mixed group, place the largest outline first and build around it. Recheck the actual edges after aligning centres: a tall neighbouring frame can make an apparently generous centre-to-centre spacing feel crowded.
Avoid enlarging a small, detailed picture merely to make it match a large companion. You can give it more mount space or reserve it for the landing. Nor does each stair need its own frame. A pause between groups often gives you a better view of the pictures than a continuous chain of unrelated images.
Let the landing start a new arrangement
Treat a level landing as a change of scene. One option is to finish the rising group before the turn, then centre a separate picture on the landing wall. Another is a small level row there. The new group can repeat a frame colour or subject without continuing the diagonal line into a wall that no longer follows the stairs.
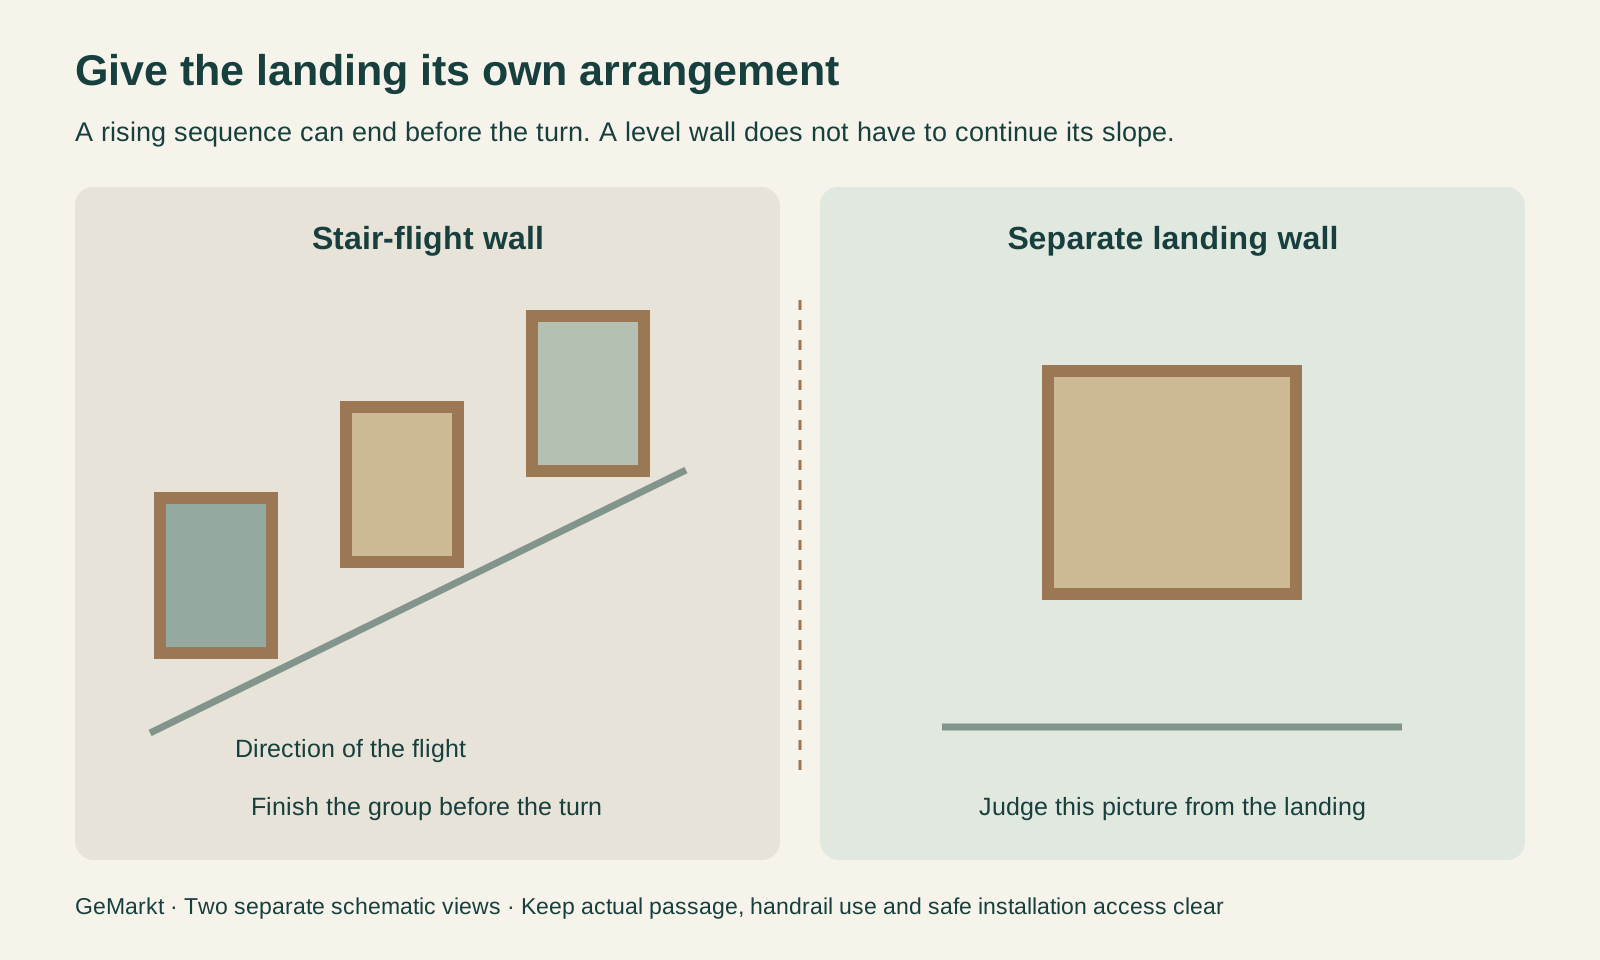
On a half-turn staircase, plan each flight as its own wall. A single diagonal projected through both can give the far flight an awkward start. Photograph or sketch the views separately, then compare the groups together from the entrance. You are looking for a family resemblance, not an exact mirror image.
Leave room for doors to open and for people to turn while carrying everyday items. The landing is still a route through the house, not a small gallery room that can borrow all the available floor and wall space.
Test the plan without working over the stairs
Begin on paper or with a straight-on photograph taken from a safe position. In a scale drawing of 1:10, the example 40 × 50 cm frame becomes 4 × 5 cm, the horizontal centre spacing becomes 6 cm and the rise becomes 3 cm. Cut out those rectangles and move them until the sequence feels coherent. Our paper-planning guide covers the method in more detail.
A photograph can help compare impressions, but perspective makes distant objects appear smaller. Do not use its apparent spacing to calculate drilling locations. Obtain real measurements safely; leave inaccessible wall measurements to the installer. Full-size paper templates are useful only where you can place and remove them without unsafe reaching or climbing.
Number the frames and note their outside dimensions, orientation and intended sequence. Keep that layout separate from the fittings plan. The hanger offset on the back means the picture’s centre is not where the wall fixing goes, as explained in our hanging-height guide.
Arrange safe access before installation
Stair access is not solved by putting a conventional stepladder wherever it seems to fit. The UK’s Health and Safety Executive guidance on ladder locations specifies firm, level support and rejects improvised packing such as bricks or blocks. Its ladder-use guidance also addresses overreaching and maintaining support while working. These are workplace safety resources, not approval for a particular home setup.
For a tall stairwell or a task requiring you to handle a frame over the opening, ask a qualified installer to assess access and the work area. Do not balance boards across stairs or furniture, stand on the handrail, or expect someone holding a ladder to make an unsuitable arrangement acceptable. The access equipment must suit the task and its manufacturer’s instructions. A shorter display reachable by an appropriate method may be the better design.
The picture itself also needs a suitable installation. The Canadian Conservation Institute includes frame and glazing in the load that hanging hardware must support. Confirm the complete object’s weight, wall construction and compatible fittings rather than choosing hardware from print dimensions alone.
Keep the gallery easy to live with
Choose positions you can maintain as well as install. Dusting, inspection and taking a picture down should not require a risky improvised climb. Keep the original installation details, and follow the fittings manufacturer’s instructions when a picture is replaced. A different frame is a different assembly even when the image size matches.
A stair window can also expose paper works to prolonged daylight. The Canadian Conservation Institute’s paper-care guidance warns against sunlight from windows or skylights because light damage is irreversible. Observe the wall at different times and consider a less exposed location for a valuable or sensitive work.
Finish by walking the route in both directions with the lighting normally used. If the sequence feels crowded, remove a picture from the plan rather than squeezing every gap. A successful rising gallery gives each work a place while leaving the staircase comfortable to use.
Editorial record
About this article
- Author
- Publisher
- GeMarkt
- Published
- Reviewed
- Internal source & rights check. Conducted by GeMarkt Research Review. This is an internal editorial check—not independent peer review.
- Source standard
- Buying guide source standardSeparates measured or first-hand evidence from general guidance and keeps practical limits visible.
Found a claim that needs checking? Report a factual error.