GeMarkt Blog · Practical guide
Art for Long, Narrow Walls
Compare one wide picture, a measured row and separate pairs for a long wall with limited height. Work with real frame sizes without stretching the artwork.

A long wall with limited height does not need a picture stretched from end to end. Start by comparing three options: one naturally wide image, a row of separate pictures, or two smaller groups with a deliberate break between them. Each can use the wall’s horizontal shape without making the art feel squeezed.
Here, “long and narrow” means a horizontally extended display area. If your space is a tall, thin strip beside a door, a portrait-shaped image is a different problem. In either case, measure the usable area and the finished frames before choosing the pictures.
Measure the usable shape not just the wall
Mark what interrupts the area: a door that opens across it, controls, a lamp, furniture or a part that is awkward to reach. Do not include those spaces simply because they belong to the same painted wall.
Then decide whether the art relates to the whole wall or to something beneath it. A sideboard at one end may give a pair of prints a natural home, even if the rest of the wall stays empty. Centring that pair on the entire wall could leave it looking detached from the furniture.
Measure outside frame dimensions, not only the paper size. Mats and mouldings add to the total. Record the available height as carefully as the width: a print that fits horizontally can still feel cramped between a cabinet and the ceiling. A flat diagram helps compare sizes before you buy anything.
Compare three layouts at the same scale
Suppose the usable display zone is 300 cm wide and 60 cm high. These examples all use finished frames 40 cm high, centred vertically with 10 cm above and below. Those margins are chosen for the comparison, not prescribed for your room.
One picture: a 200 × 40 cm frame leaves 50 cm at each side. Three pictures: three 60 × 40 cm frames with two 10 cm gaps also occupy 200 cm, leaving the same side margins. The groups have equal overall width but very different divisions.
Two pairs: four 40 × 40 cm frames make two 90 cm-wide pairs, each with a 10 cm internal gap. Leave 60 cm between the pairs and the total becomes 240 cm, with 30 cm at either end. This separates two groups rather than spacing all four frames evenly.
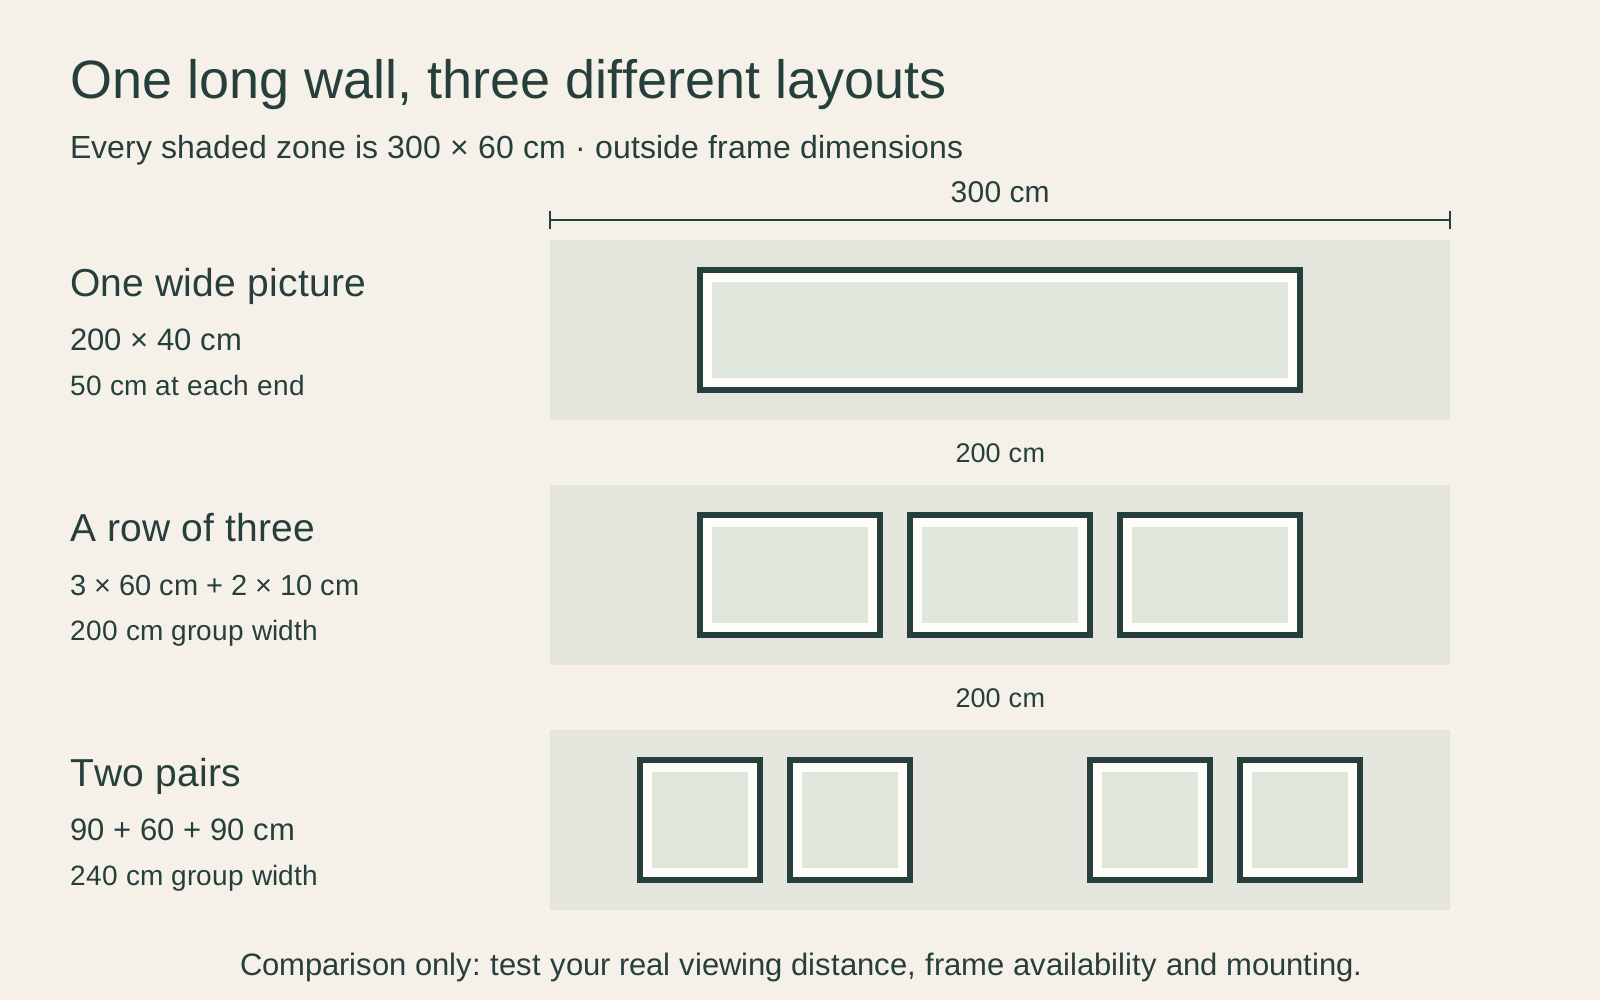
The unusually wide first frame is a comparison, not an assumption about standard retail sizes. Check availability, finished weight and practical installation before making that option your plan.
Use one wide picture when the image suits it
A single wide work can give the eye one thing to settle on. It is worth considering when the wall is visible as a whole from across the room and the image already has a horizontal composition you enjoy.
Look beyond the aspect ratio. A panoramic view with recognisable forms across its width may read differently from a broad image whose interest sits in one small corner. Open the actual file or full product preview, not only a narrow shop thumbnail.
A very wide frame can also be difficult to carry around a staircase or through an awkward entrance. Confirm the delivery format and outside dimensions. If those complications become the main feature of the purchase, a smaller picture or separate row may be the more useful choice.
Make a row read as one group
Choose one clear connection between the images: a series, a subject, a palette or the frame treatment. Three pictures do not need to be near-duplicates, but a link helps explain why they share the wall.
For equal frames, start with a consistent gap and a level horizontal alignment. View the whole row before adjusting individual pieces. If one print contains more white space than the others, it may feel lighter even though all the outside measurements match.
Do not solve that immediately by cropping away its border or enlarging its artwork. Try changing the sequence first. The gallery-wall planning guide shows how to compare a group before transferring it to the wall.
A row can reward walking along it, with each picture offering a closer look. If you only see it from a distant sofa, fewer larger images may be easier to appreciate.
Split the wall when the room is already divided
A long room may contain a reading chair at one end and a dining table at the other. Two related groups can acknowledge that arrangement without forcing one continuous band of frames above both activities.
Keep the middle break intentional. In the diagram, the gap between pairs is much greater than the gap within each pair, so the grouping is easy to understand. In your room, the break might line up with open wall between pieces of furniture rather than a perfectly symmetrical calculation.
Try one group first. You may find that it gives the room enough interest and the second would simply fill space. Empty wall can separate activities and make an existing picture more noticeable; it is not automatically an unfinished part of the design.
Protect the shape of the original image
Never stretch a normal painting into a panoramic rectangle to make the wall plan work. Changing its proportions distorts figures, objects and the composition. Pick a naturally suitable image, display the full work with appropriate surrounding space, or choose separate pictures.
If a seller offers a detail crop, inspect the exact preview. A crop should be clearly presented as a detail, not mistaken for the complete artwork. Consider what has been removed and whether the remaining section makes sense on its own.
Standard frame proportions and famous paintings often differ. Our guide to painting proportions and frame sizes explains the choices without treating distortion as a solution.
Check close and distant views
View the layout from the position where you spend time and along the route people use. The Canadian Conservation Institute specifically recommends considering physical contact and busy passageways when placing paintings. A frame that projects into a narrow route needs a different assessment from one above unobstructed furniture. CCI display guidance.
Look for reflections, direct sun and nearby heat too. The width of the wall does not make every part of it equally suitable. A break in a row can be better than carrying it across a radiator or forcing a picture into an exposed position.
Make the final plan full size
Use paper templates at the actual outside dimensions and mark the image areas inside. Measure the gaps between frame edges, then step away and compare the entire arrangement. Do not start drilling from a small sketch alone.
Check the real wall construction, finished weights and manufacturer instructions before choosing the hanging system. The example dimensions in this guide establish layout arithmetic, not the capacity of a fixing or suitability of a wall.
Order when the plan answers three questions: can you see the images properly, does the grouping relate to the room, and can it be installed appropriately? Filling the maximum possible width is not a fourth requirement.
Editorial record
About this article
- Author
- Publisher
- GeMarkt
- Published
- Reviewed
- Internal source & rights check. Conducted by GeMarkt Research Review. This is an internal editorial check—not independent peer review.
- Source standard
- Buying guide source standardSeparates measured or first-hand evidence from general guidance and keeps practical limits visible.
Found a claim that needs checking? Report a factual error.