GeMarkt Blog · Practical guide
How to Flatten a Rolled Poster
Handle a newly delivered rolled poster carefully, decide when gentle dry flattening is appropriate and recognise when to stop and ask the printer or a conservator.

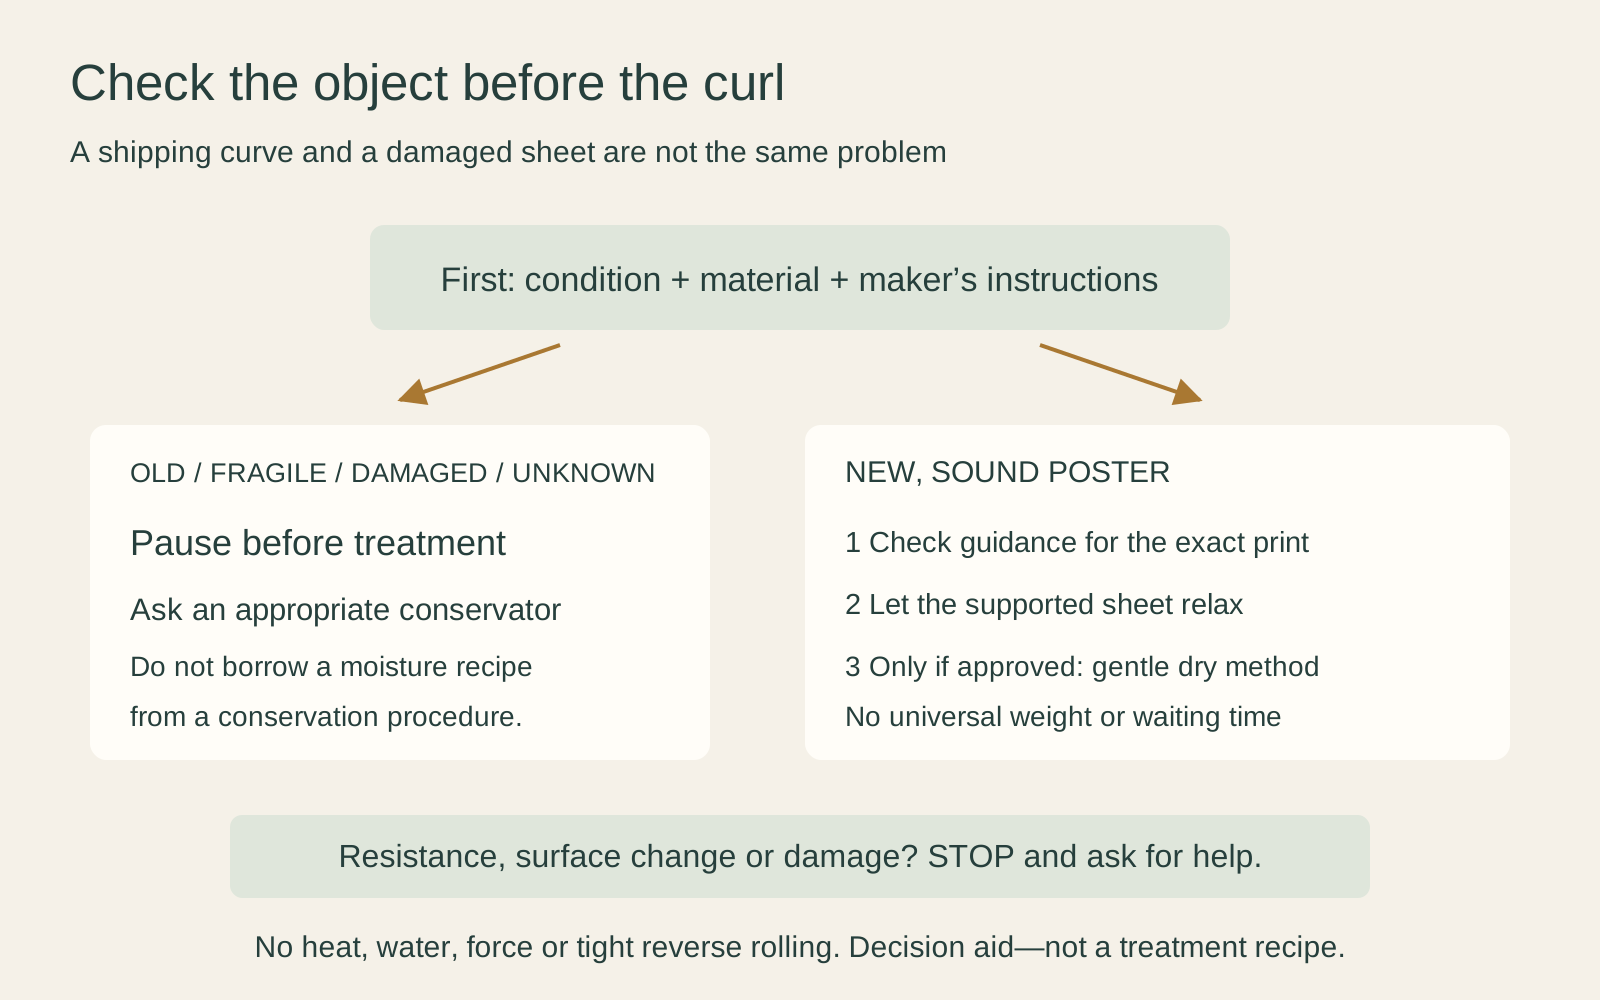
For a new, undamaged paper poster, start with careful unpacking and a supported rest in a clean, dry room. If it needs further help, ask the printer whether gentle dry flattening suits that exact print. Do not add heat, water or force. Old, valuable, brittle or damaged paper needs a different decision, not a stronger version of the same home method.
It is frustrating when a picture you want to frame keeps returning to its shipping shape. The useful goal is a sheet that can be handled and fitted safely, not instant perfection on the kitchen table. Prepare the space and identify the material before trying to remove the curve.
Check whether this is just a curl
A broad, smooth curve is different from a sharp fold, a crushed edge or a crease through the image. Inspect the packaging and what is safely visible before opening the sheet fully. If the tube is wet, flattened or badly punctured, photograph it and contact the seller rather than immediately attempting a repair.
Ask what kind of object you have. A newly printed decorative poster is not equivalent to a decades-old cinema poster, a photograph with an unknown coating or an original with raised paint. Handwritten signatures, embossed marks and fragile additions deserve extra care too.
The National Park Service’s paper-flattening guidance explicitly reserves numerous materials for professional conservation treatment, including coated papers, photographic prints, brittle objects and works with easily disturbed media. Its controlled humidification procedure is not a general recipe for anything that arrives in a tube.
Prepare a place before opening
Find a clear table large enough to support the whole sheet, including its margins. A small desk that leaves the lower half dangling creates a handling problem before you have started. Keep the area available so you will not have to move everything midway through dinner.
Remove drinks, crumbs, pens, tape and sharp tools. Have any clean protective wrapping supplied with the print ready, together with the maker’s care instructions. The Library of Congress recommends clean hands and a clean work area, and warns against ordinary tape, glue, rubber bands and fasteners on paper.
For a large sheet, arrange help before lifting it. Decide who supports each side and where it will go. If a pet or child can reach the table, choose somewhere else rather than relying on the print being undisturbed for a few minutes.
Let the sheet open without a fight
Read the supplying printer’s unpacking instructions before removing the wrapping. Keep the product label: it may identify the paper or coating more precisely than the order title. If the instructions concern a different product, ask for the correct version instead of filling in the missing steps yourself.
Leave any unfamiliar protective layers in place until you know their purpose. Note whether the printer expects you to remove them now or leave that task to the framer. Reducing unnecessary handling is more useful than repeatedly opening the sheet to see whether the curve has changed.
Canson’s instructions for its print media stress surface sensitivity and keeping the material away from heat and humidity sources. For an unidentified poster, the practical next step is to ask its maker, not infer treatment tolerance from paper thickness or the word “fine art.”
Use a dry method only for suitable prints
For its own rolled prints, Printkeg recommends initial relaxation and, only when almost flat, gentle distributed dry weighting. Ask your printer whether that advice suits your exact material.
Treat that as a reason to request instructions, not a complete procedure for your own print. Ask the supplier to specify any contact layer, support, load and checking interval in writing. We do not prescribe a stack of household materials here: the maker must first identify what can safely touch its printed surface.
Your choice may also be practical. If you have no suitable workspace, explain that when asking for help. A framer can assess the supplied instructions and object together; a home method that depends on equipment you do not have is not a useful recommendation for you.
Avoid turning a poster into a treatment project
Do not use heat, water or household appliances to change the curl. The paper, coating and ink may react differently; material identification comes before any treatment.
A conservation procedure found online can look simple while relying on material identification, suitable equipment and judgement at each stage. The NPS procedure, for example, pairs controlled humidification with a specific drying sequence and excludes vulnerable materials. Borrowing just the “add moisture” part removes those conditions.
Do not force the sheet or roll it tightly backwards. Decide the mount opening later: a future frame is not permission to sacrifice a margin now. A signature, edition mark or handwritten dedication outside the main image may be part of why you chose this particular object.
Decide when to stop
Stop if the image surface changes, material begins to separate, an existing tear opens, or the paper strongly resists gentle handling. Do not increase pressure to solve a new mark. Keep a note of what happened and seek advice before another attempt.
Consider two different situations. A new poster with a mild curve but no surface damage may simply need the maker’s normal preparation before framing. An inherited exhibition poster that has spent years in a narrow tube needs assessment even if you intend to use an inexpensive frame. Its age and condition matter more than the frame price.
If a delivery deadline is approaching, change the plan rather than rush the paper. You could present a photograph of the gift and have it framed later. A delayed hanging is easier to resolve than a crease you introduce while trying to finish tonight.
Prepare for framing not perfection
Once the sheet is manageable, arrange its framing rather than continuing to chase a perfectly flat appearance on the table. The Library of Congress’s framing guidance calls for separation between the object and glazing. The frame is a display enclosure, not a substitute for suitable preparation of the sheet.
Decide the display size before the appointment, but let the framer see the complete sheet. A border, signature or uneven edge may affect the mount opening. Bring the product description if the paper and printing method are not obvious.
If framing must wait, choose suitable protected storage rather than leaving the poster exposed on the table. Our unframed-print storage guide covers that next step.
Ask for help with useful information
Send the printer an order reference, overall photograph, detail of the curl or damage, and a picture of the packaging if relevant. Explain whether the sheet is new, whether it has already been unrolled, and anything you have tried. Do not promise that a home method was harmless if you are unsure.
For an old or significant work, contact a paper conservator; for an ordinary new print, the supplying printer or an experienced framer is a sensible first contact. The useful outcome is not merely “flat.” It is a print ready to enjoy without sacrificing its surface to get there.
Editorial record
About this article
- Author
- Publisher
- GeMarkt
- Published
- Reviewed
- Internal source & rights check. Conducted by GeMarkt Research Review. This is an internal editorial check—not independent peer review.
- Source standard
- Buying guide source standardSeparates measured or first-hand evidence from general guidance and keeps practical limits visible.
Found a claim that needs checking? Report a factual error.