GeMarkt Blog · Practical guide
Mat Board: Width, Colour and When to Skip It
Understand mat board, window openings and visible borders, with a worked sizing diagram and practical advice on colour, preservation and mat-free framing.

A mat is the board border between a work on paper and its frame. Choose its width and colour with the actual print in front of you, then confirm its outside size and window opening separately. If you prefer the look without a mat, ask how the paper will be kept away from the glazing instead.
The most common ordering confusion is calling everything the “print size.” The paper sheet, the visible image, the mat opening and the finished frame can all have different dimensions. Getting those names right is more useful than finding a supposedly perfect border width.
What the mat actually does
The visible part is usually a window mat: a sheet of board with an opening cut through it. A white margin printed on the same paper as the image is not a window mat. It may look similar in a small online picture, but it adds no separate layer between the print and the glass or acrylic.
The Canadian Conservation Institute explains that a window mat helps keep the image clear of the glazing. Its opening should also reveal significant marks, including signatures and titles. Do not let a framer cover those details simply to make a standard opening fit. CCI: Matting Works on Paper.
For this guide, “border width” means the width of board around that opening. It does not mean the width of the frame moulding, which is a separate part.
Separate the outside size from the window
Consider a deliberately simple example. A mat has outside dimensions of 40 × 50 cm and a centred opening of 24 × 34 cm. Subtract the opening from the outside dimensions and divide by two:
- Side borders: (40 − 24) ÷ 2 = 8 cm each.
- Top and bottom borders: (50 − 34) ÷ 2 = 8 cm each.
A 26 × 36 cm sheet placed centrally behind that opening would overlap it by 1 cm at each edge. This example assumes those hidden margins can safely be covered. It is not a recommendation to conceal a centimetre of every print, nor a mounting specification.
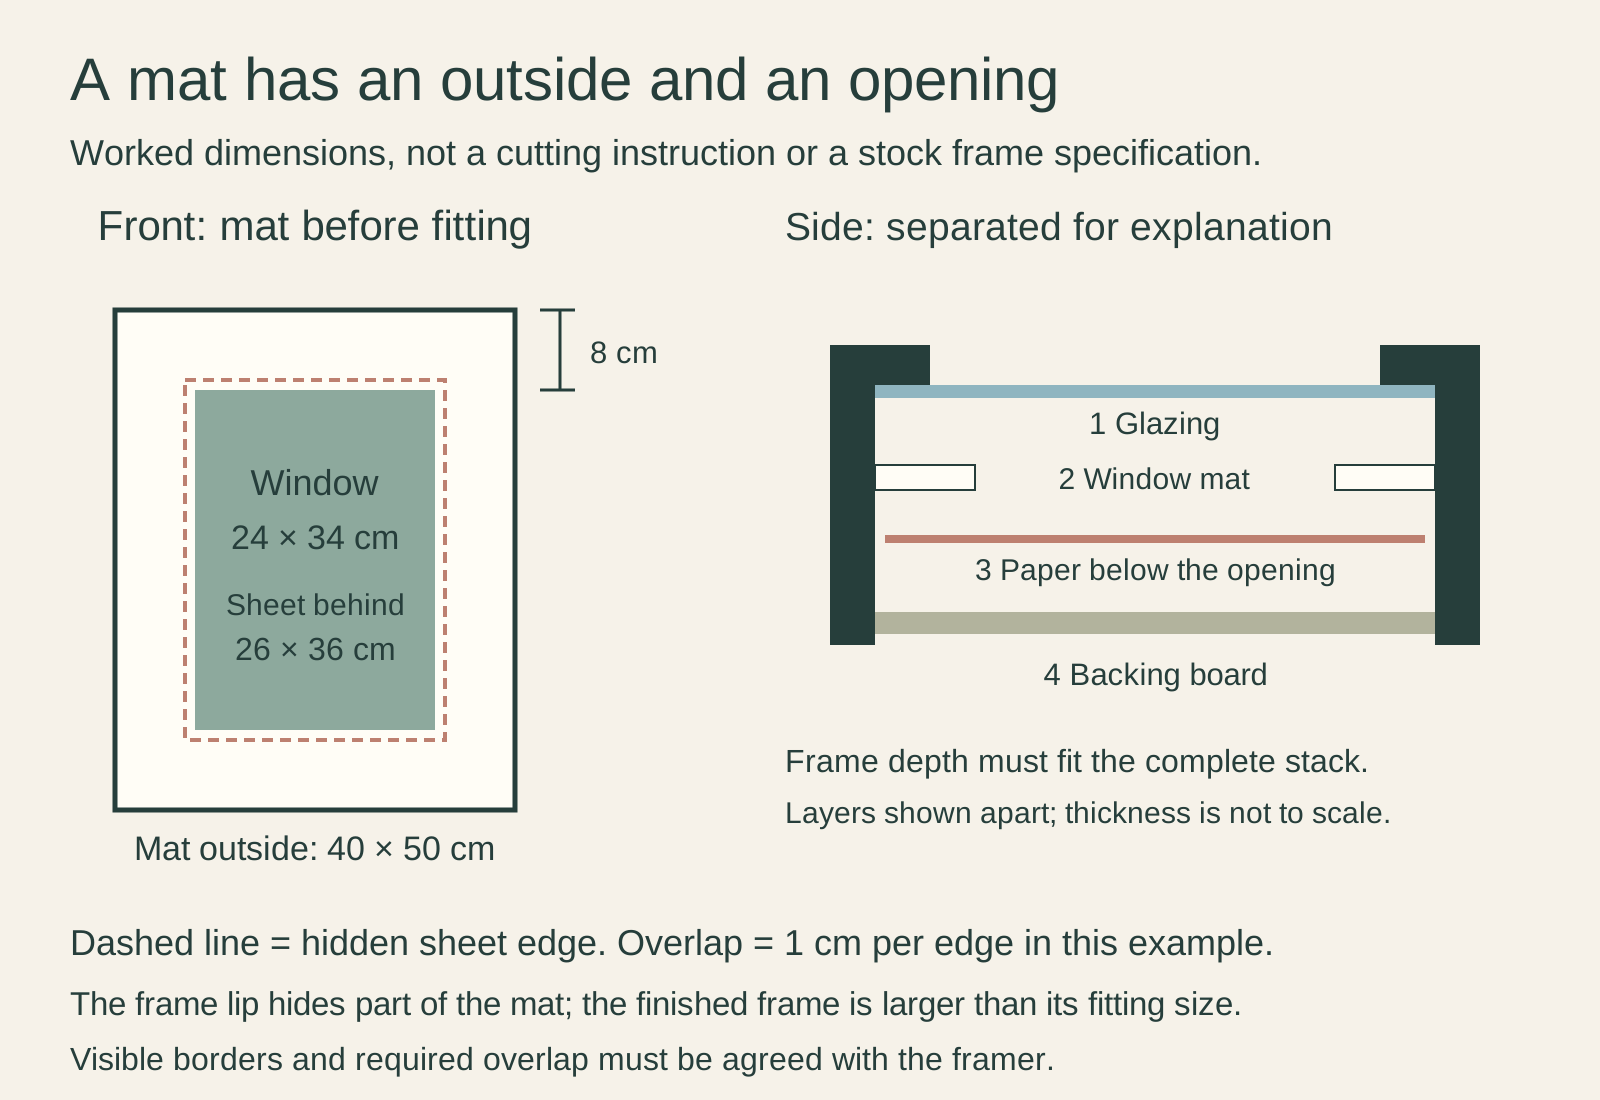
The frame’s front lip hides a little of the mat’s outside edge, so an 8 cm board border is not necessarily an 8 cm visible border once framed. Nor will the complete frame measure 40 × 50 cm outside: its moulding extends beyond the fitting area. Ask for the final exterior dimensions when checking wall space.
Choose width by testing the finished size
There is no single ideal mat width for all prints. Our suggestion is to compare two visibly different widths before considering fine adjustments. Place clean strips of neutral board over the proposed margins, without attaching them to the print, and view the result from where it will hang.
A wider border makes the whole framed object larger without enlarging the image. That can help a small, detailed print hold its place in a group, but it will not make the details readable from farther away. A narrow border keeps the frame closer to the image; in a cramped arrangement, that may be the more useful choice.
Start with equal top and side borders. You can also try a slightly deeper bottom border if you prefer that appearance. Neither approach obliges you to use a particular numerical ratio. Check that the resulting frame still fits the wall and your budget before settling the mat width.
Compare colour against the print
Begin with a neutral board, then compare a warmer and a cooler alternative against the paper and image. A warm off-white may sit comfortably beside a cream-coloured reproduction; a bright white can make that same paper look more yellow by contrast. Which effect you want is a design decision, not a test of whether the print is authentic.
Bring in the frame sample before deciding. The mat is seen between the image and that finish, not as an isolated paint swatch. If you want a coloured mat, try a restrained colour already present in the picture and compare it with the neutral version. The coloured option does not need to win merely because it matches.
Use physical samples where possible and examine them in the room’s normal light. A screen mockup is useful for comparing proportions, but it cannot promise an exact match to the board or paper you will receive.
Ask what the board is made from
Colour alone says nothing about conservation suitability. The Ford Conservation Center specifies acid-free, lignin-free board made from rag or alpha-cellulose for preservation framing. Ask for the board’s product specification rather than relying on a decorative label or the word “archival.” Ford Conservation Center: Matting and Framing.
How the print is attached matters too. Ford distinguishes suitable conservation hinges from ordinary glues and pressure-sensitive tapes applied directly to the object. If the work is valuable, fragile or irreplaceable, have the attachment selected by a qualified framer or conservator rather than improvising with household tape.
These precautions do not turn a frame into permanent protection against every environment. You will still need to consider where the work is displayed and how it is handled.
When a mat-free presentation makes sense
You might prefer a poster to meet a slim frame without a broad board border. That is a reasonable visual choice, but the construction still needs attention. CCI describes spacers as an alternative for flat, stable works; distorted paper and loose, powdery media need different assessment. “No visible mat” should not mean “paper pressed against glass.” CCI: Framing Works of Art on Paper.
If the sheet’s edges are part of its appeal, ask about float mounting, which keeps the sheet’s edges visible rather than overlapping them with the window mat. Ford’s guide describes concealed hinging for this arrangement. Float-mounted paper is not the same thing as a floater frame around stretched canvas; be explicit about which object you are framing.
Write down the order before it is cut
Record the sheet size, the image area you want visible, the exact window opening, the outside mat size, the colour and board specification, and the final outside frame size. Confirm which measurements include overlap or fitting allowances instead of silently adding your own.
Then ask how the work will be mounted and separated from the glazing. Those details belong on the order alongside the attractive choices. If the finished object will be larger than expected, return to the layout before ordering, rather than shrinking the opening and hiding part of the picture.
Editorial record
About this article
- Author
- Publisher
- GeMarkt
- Published
- Reviewed
- Internal source & rights check. Conducted by GeMarkt Research Review. This is an internal editorial check—not independent peer review.
- Source standard
- Buying guide source standardSeparates measured or first-hand evidence from general guidance and keeps practical limits visible.
Found a claim that needs checking? Report a factual error.